Red 5 Standing By - Something a little different

Obviously, the vast majority of the work that I do is game-related. Not ALL of it but 95% at least. When I get a project that falls outside of that standard I'm always a little excited. When I was asked to do a build-up of the Bandai 1/72 scale X-Wing I was thrilled!

Bandai 1/72 scale X-Wing

If you're unfamiliar with Bandai, you've probably see their stuff before. They're mostly known for their vast array of Gundam models, though that's not the only thing they do. They've been doing models for a very long time and they're are known for their detail and the cleverness of their designs. That is all on display with this kit.

This kit goes together brilliantly. It's essentially a snap-kit. That is, you could, if you wanted, put the whole thing together without the use of glue. I wouldn't recommend it but it's clear as you build it that it's possible. On top of that you are given options to build this specifically as Luke's "Red 5" or some of the other craft featured in Star Wars. The physical differences between the different versions are so small that only a real super-fan would be able to tell the difference (I wouldn't be able to) once it was painted but still the variant parts are there if you want them.

Another thing of note in this kit is the markings set. There are actually two sets. One is a standard water-slide decal set. The other is an adhesive "sticker" set. To be quite honest I have no idea why they bother with the stickers. They might work for flat surfaces, but I actually experimented with some of the smaller ones on curved surfaces (I was curious) and they just do not work. At all. But you can just throw those out and go with the others. They are nicely printed graphics. Perhaps a BIT thicker than I might like. The only problem with them is that they take a lot of effort to conform to the details (panel lines, etc). They will conform, though as long as you have some Micro-Sol on hand.

There are decals for everything, too. I expected to have the red markings and maybe the yellow and blue ones but they also include decals for some of the areas where the panels are a slightly different color than the hull. There's a decal for the canopy color! I suppose if you're using the clear piece that keeps you from having to mask it (I used to non-clear canopy) so that's a nice addition. I actually tried it and it's... ok. Painting will look better but if you wanted the clear piece and weren't up to it then you'll probably appreciate it. The helmet decals for the pilot are nice as well and they include a lot of extras because working on things that tiny is tough. I managed to only screw up one of those.

Painting this was really fun. I started with a black basecoat and then painted the hull with the airbrush using white paint and focusing on individual panels starting in the center and working outwards. I use this technique a lot for surfaces that I want to appear aged as this gives you a starting point where the paint looks faded and dirty. Plus, there's really no way to do each panel exactly the same every time so you get a really good realistically varied look to it.

I did work a bit from reference photos of the studio models to make sure that I got the right overall feel from the paint job, but I also put a lot of my own style into it as well. For example,  the kit recommended a mix of white with a small amount of Light Ghost Gray to get the hull color. I started with white, then used Warcolors Warm Grey 2 lightly sprayed over the whole thing to reduce the contrast of the panel lines and to add some warmth to the color. Weathering is something that you just have to play with slowly and build it up until you're happy with it. Warcolors Transparent Black came in handy here. I used it to provide some subtly shadowed areas as well as some of the more dirty and blasted areas. What I didn't do on this kit were any washes. None. That's weird for me, but as I was working on it I didn't think that they would work well with the look I was trying to achieve.

I definitely could have done more with this, but eventually you reach the point of diminishing returns, or worse, you start making it worse. I think this was a good stopping point. Now I'm wondering if I need a 1/48 scale Fine Molds X-Wing.

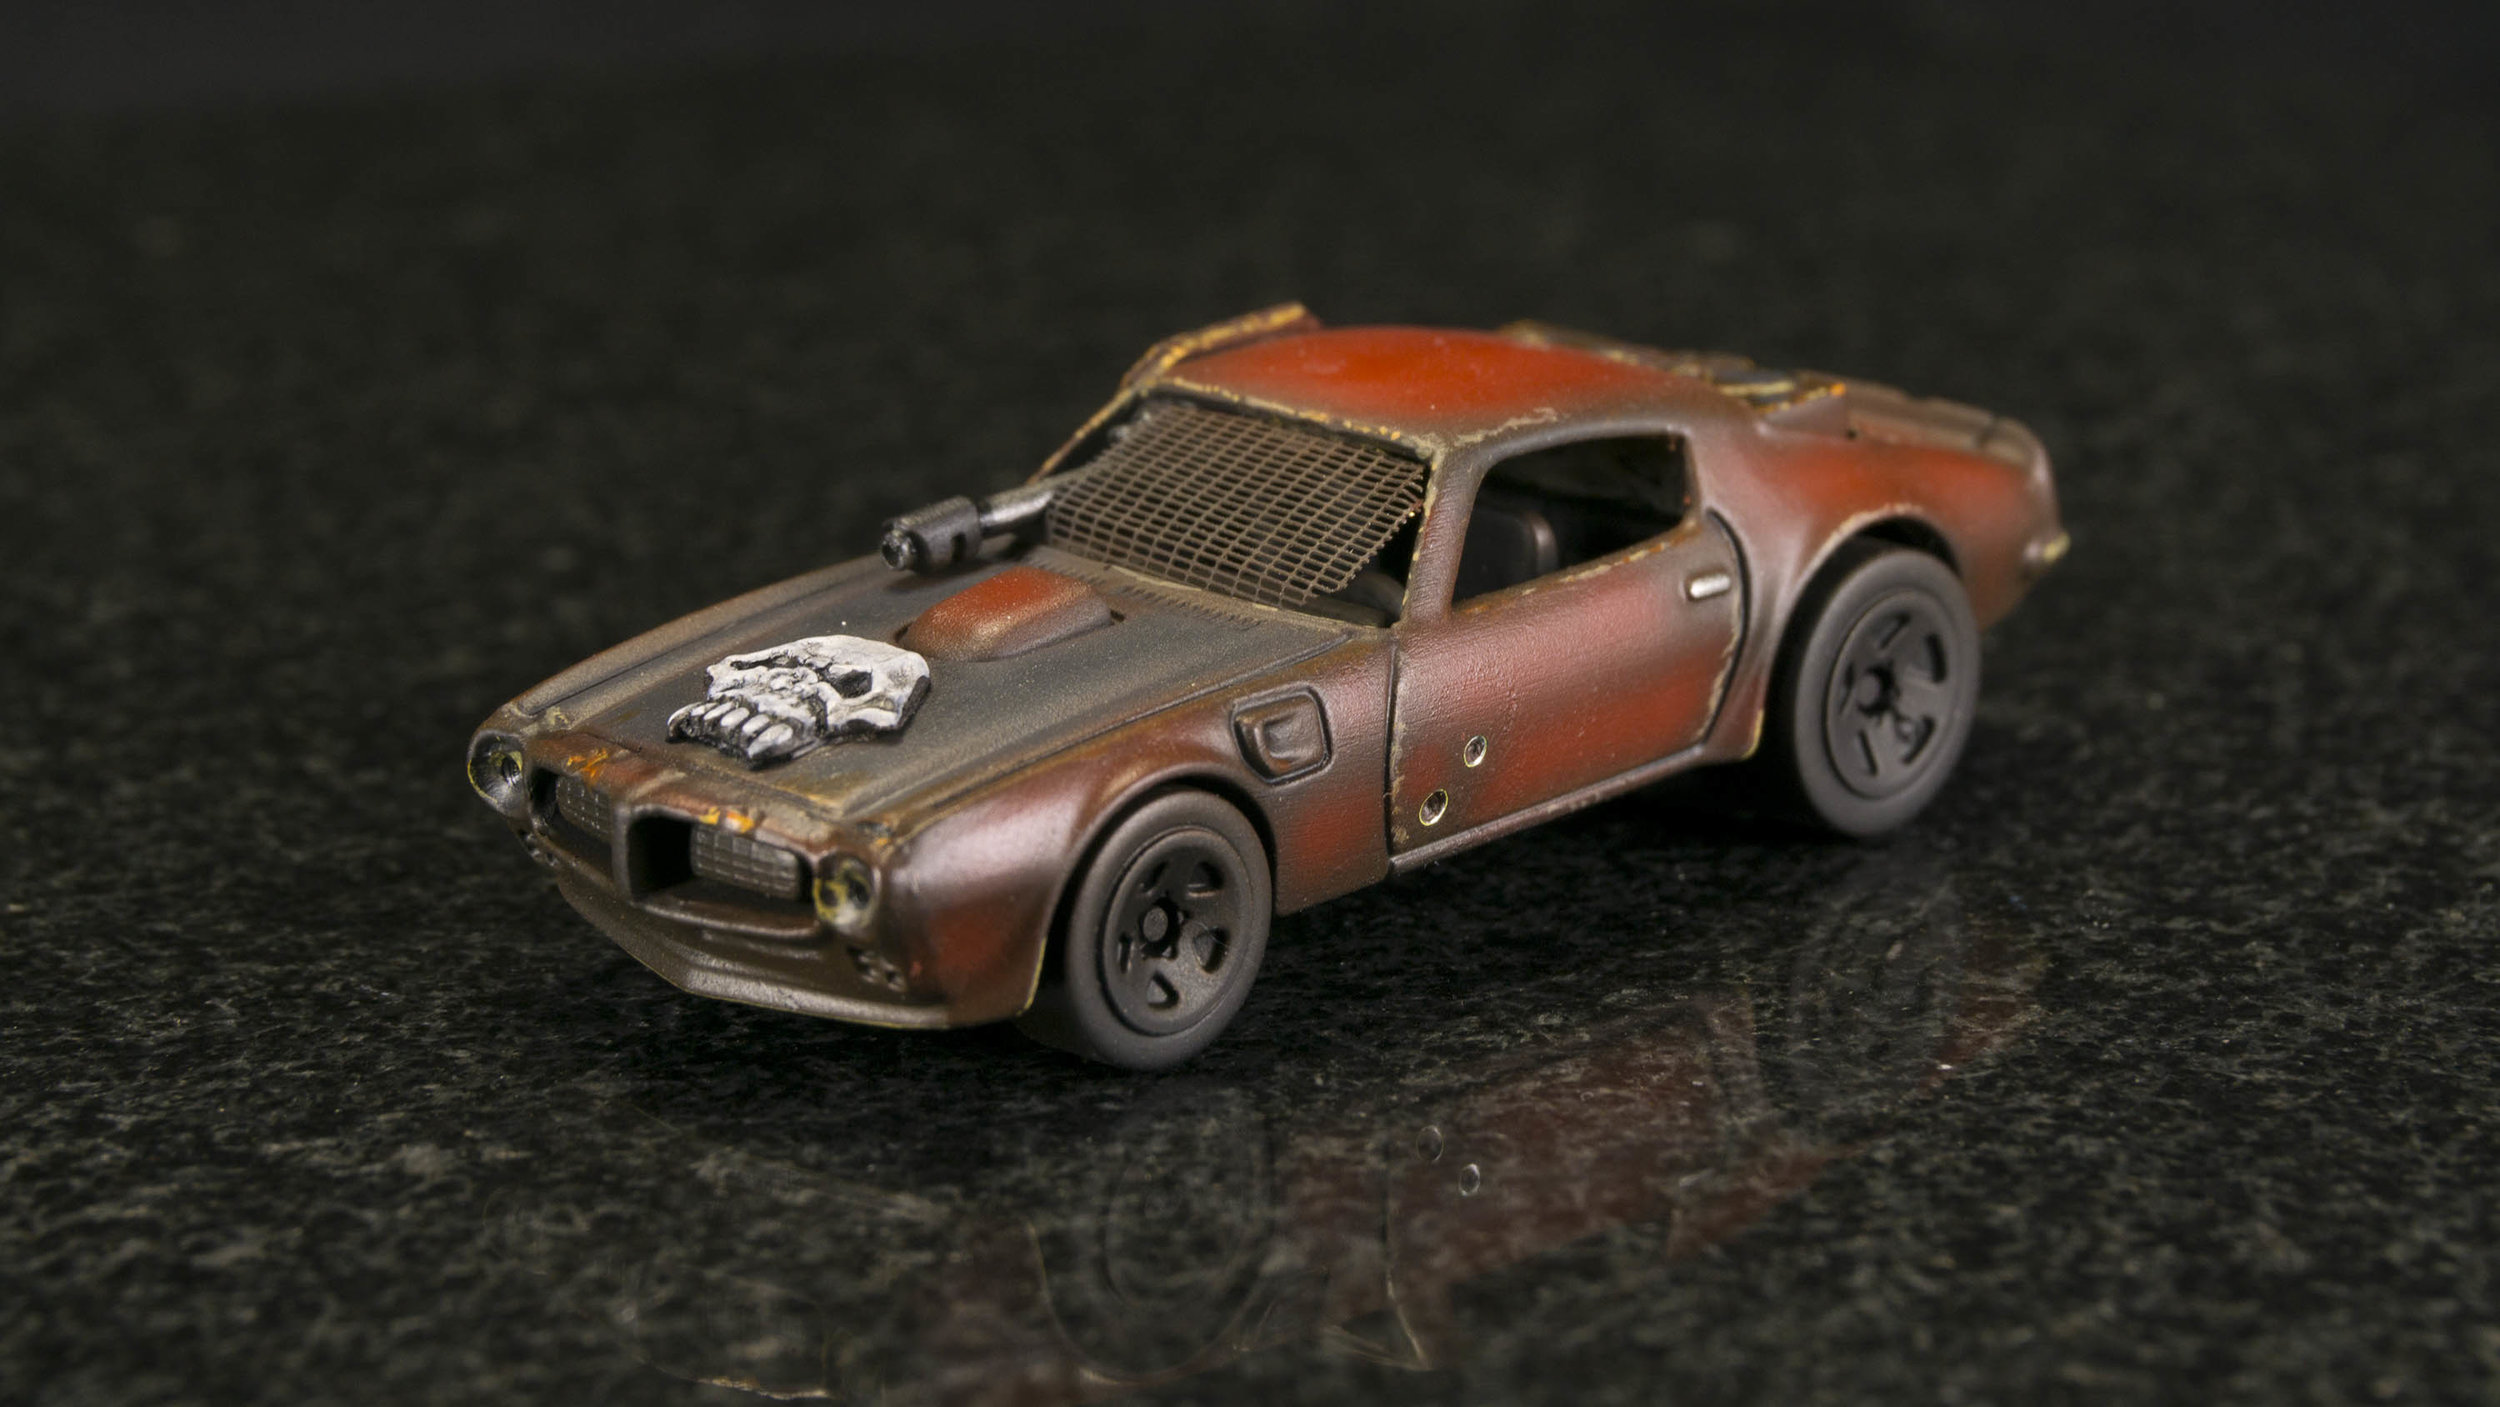
I'm gonna die historic on the fury road!

For the longest time I've wanted to do Road-Warrior-Like car conversions with Hot Wheels. Probably since the first time I played Car Wars (even though, at the time, Car Wars was an entirely different scale). Well, ever since the release of Gaslands I've decided that I was going to make that dream a reality.

My first conversion

My first conversion

Having purchased the Gaslands rulebook I was armed with a reason to do a project (even though I didn't really have a specific car I was trying to build rules-wise). I bought a handful of Hot Wheels and picked one mostly at random to get the treatment.

I should have taken photos of the process but I was really just fitting this in as I was working on minis that pay the bills. But I can tell you that I started out but taking the thing apart. There are two pins on the undercarriage that you need to drill out. I did it with a pin vise and it wasn't a problem at all. The metal is pretty soft.

Once I had it apart I did some modifications to the body. I drilled out the headlights, added a couple of bullet holes, and dragged one of my Dremel bits down the right side. I used the same bit to add some damage to the front and back of the body. I then did some light sanding to the existing paint (320 grit) and gave it a light black primer.

At this point I went digging through my bitz boxes. I needed a weapon for sure, but I was also looking for other things to improve the look. I turned up a weapon pretty much straight off. It's a Rogue Trader era Lasgun. I can't believe I still have some of those things, but at this scale they make a good-sized generic gun barrel. It could be a laser, a light cannon, or a machine gun. I also turned up a similarly old shield badge for Warhammer that I thought would work good on the hood and a piece of brass-etch grill that has been in their since about 1997. Lastly I grabbed a sprue of parts from a 1/144 scale Robotech model.

The other side

The other side

I mounted the gun to the roof of the car with a bit of putty. I took the shield badge and used the Dremel to gouge a channel down the center of the back so that it would lay flush on the hood, then added some putty to smooth it all out. The brass went in in place of the windshield (as I was throwing that out anyway). I also cut a little piece of plastic to go over one window. The Robotech model turned up a couple of bits that looked like metal boxes or perhaps a fuel tank that I put in the back (you can almost see them in the pics).

At this point I could start painting. I started with the a hint of rust brown over the black. You can see it clearly on the steel panel over the right window. It was really there to show through a bit after I put on the next coat - implying underlying rust. The second coat was Warcolours Red 3. I faded it in much like I do my tank paint jobs. That is, I focus on the center of a panel and work my way out from there. It provides a nice color effect and in this case gives the car the look of an older vehicle that has had it's color slowly leached out by the rust that's coming through. Where I wanted to show much more rust I dabbed on a couple of different rusty colors - one darker rust brown, one bright orange. The trick with making this look right it to thing about where the car is going to get dinged up and stick with those areas.

I wanted the big scrape along the side to be fresh. I decided that rather than painting the exposed metal I was just going to expose the metal. When I used that Dremel bit it left a really nice polished metal underneath. So I took a toothpick and removed the paint from the scrape, then added a bit of rust to the edges. I did something similar with the bullet holes. I just carefully put a drill bit over the holes and scraped the paint from the edges of the holes leaving a bright metal ring.

The hood isn't actually black, it's actually a dark cool grey (Warcolours Grey 5). The skull is a simple white with black wash.

Overall this was a really simple conversion and paint job and it was a lot of fun. I have another dozen or so Hot Wheels at the moment that are all longing for some conversion work. I expect to do at least several more in the near future.

I'm on a Podcast!

I recently had a long conversation with Dave from Layers Miniature Painting Podcast where we talked about all sorts of things. If you've ever wanted to learn more about me there are worse places you could do that.

FYI - The podcast itself is fairly new. This episode is only #10 but I've found that I'm really enjoying it. I've often thought that a podcast isn't the best medium for discussing our hobby as it such a visual hobby. It turns out that it can work and I do enjoy listening to Dave's discussions about all things miniature painting. It is a little more focused on the beginning painter than those of us who have been doing this for a while but I always come away feeling like the time spent listening was worthwhile.

Have a listen.


Jay - Where have you been???

Since somebody just e-mailed asking if I was still doing commissions I thought it might be a good idea to post something here letting everybody know what's been going on recently.

First of all, let me answer the question that prompted this post.

Yes - I'm still taking commissions.

Actually, there's a longer story there. You see, for the past year I've been working part time at my local post office in addition to doing commission work. I figured that I'd be able to get a more steady paycheck in addition to the boom or bust commission payments and sort of even things out. In addition, for a number of years the holiday season has always been super light for commission work and as this is the busy season for the post office I figured that this would work out well.

This ended up working pretty well in one respect - it definitely made my income more steady. On the other hand the part time job I thought I was taking was part time some weeks, full time others, and more than full times in some circumstances. It made is REALLY hard to keep my commission work on schedule. In addition to that issue my commissions requests just kept rolling in. Big projects like Kingdom Death Monster 1.5 started piling up shifting my schedule further into the future. Where I was used to scheduling 3 months out my schedule was being booked 6 months in advance - Well past the holiday season that normally thins out.

Another thing that really took a hit in this period were my videos. They have always been hard to fit in to my schedule when I was just painting but they became impossible while I was trying to fulfill the needs of TWO jobs. That's why you haven't seen a new video out of me in a while.

With all this in mind it wasn't difficult to decide that maybe I should just go back to painting full time. It's the thing I love to do and the work is there. So as of right now I'm a full time painter once again.

I've actually been looking at the schedule I'd put together based on having the other job and I must say that it does look like a TRIED to account for the fact that I didn't have all day to paint but some months... I'm not sure what I was thinking. In any case, the schedule is going to compress some. I'm thinking that I'll end up moving things forward at least a month for some of the projects that were farther out - maybe even more. It'll take a few weeks before I can really nail that down, but that's what it looks like now.

As for videos - yes, I'm going to try to get those going again. I have some things I want to do, but for the moment they will have to still be on a "whenever I can do them" timeline rather than a fixed schedule. Much as I'd like to make the videos more of a focus they just aren't paying the bills so I can't divert too much of my time to them for now.

Anyway, I'm happy to be back doing this full time!


Where to find 3D printable terrain files

I just had a question on YouTube about where to find 3D printable terrain files and I realized that I've gone digging for this information myself without ever creating a useful list for myself. So I'm going to put this down here for now and then update it down the road.

Free Terrain Files

Thingiverse - This is my first stop for digging for any 3D files. It's not perfect as searching for something that you want can sometimes take all of your keyword-kung-fu to find something useful. Still, there is a lot of useful things there. If you want to save yourself a bit of time be sure to jump right over to Dutchmogul's designs. I don't believe that there's a more prolific 3D designer of game-related files on Thingiverse. Even the things that he makes for odd scales (like 18mm) are usually easily rescaled to make the more useful to whatever it is you are doing.

Yeggi.com - Unlike Thingiverse, Yeggi is really just a search engine for 3D files. If you search for 3D files on Google you are likely to run across results from Yeggi (which is how I discovered it). Most of the hits that you get will end up linking back to Thingiverse - but not all of them. I've discovered a lot of little sites that host 3D files with Yeggi. Additionally, you will sometimes get hits to Thingiverse that you don't get when searching that site directly.

Paid Files

Printablescenery.com - Printable Scenery is quickly building their brand to be THE place to find 3D printable terrain for gaming. Funding their business with Kickstarter campaigns, the site now offers a wide range of files for different game settings. Most of what they offer at the moment is either fantasy or "historic". The Historic range is a mix of things that seem mostly suited for WWII as well as a smattering of more eclectic pieces (like Marori huts or Native American structures). The Fantasy category the most packed with items as it includes both historic items that would work in a fantasy campaign as well as some true fantasy-inspired pieces like dungeon walls, strange towers, or the wonderful Winterdale line of castle walls and buildings.

Fat Dragon Games - FDG's offerings are all focused on dungeon tiles and fantasy dungeon setting related items. Of course some of the scatter terrain-like items could work in a variety of settings so even if fantasy and dungeons aren't your thing it's definitely worth a look.

Dicey Ventures - More fantasy offerings. In this case it's really stylized fantasy buildings like you might see in a 1980's cartoon. Interesting designs if that's what you're in to.

Thunder Chrome - TC's focus is post-apocalyptic shanty-town-style buildings. I really like their design aesthetic. It seems to be very Fallout inspired.

As I've researched this list I've found that many of the Kickstarters that offered 3D printable terrain never turned into ongoing companies. Some just vanished. I suppose that this is to be expected. 

If you know of any individuals or companies that are offering downloadable game terrain pieces please either contact me directly or leave a comment.

Making a simple "Mars" base

I can find all kinds of excuses not to make videos. One of my favorite excuses is "that's so simple - nobody is going to care about that!" The thing is, there's always somebody who can use that extra bit of information and something that seems simple to me isn't necessarily obvious to somebody else. 

In this particular case I actually through together some simple bases for a project and the whole thing was easy - but I did it with materials I'd never used in this way before so I thought "why not do a video?" and this was the result.

Goodbye, Winsor Newton Series 7, it's time for me to move on

Since the mid 1980's the Winsor Newton Series 7 brushes have been my go-to miniature painting brushes. Using them for the first time was a transformational experience for me as a painter and they've come along with me through all of the years since. Expensive as they are, they always felt like a necessary tool for me.

Ever since the embargo on the brushes I've started looking around at other options. I have to admit that it felt a bit like cheating. The problem was that in addition to the price of the brushes there was this added issue of not necessarily being able to get them when I needed them in the sizes that I wanted them. This was a problem for me.

At some point along this journey somebody had mentioned Rosemary and Company brushes as being a good, cheap alternative. At that point whenever anybody suggested brushes to try I would just try them so I bought a few of their Series 33 brushes. They were definitely cheap, though the shipping cost meant that you really needed to buy a few to keep the price per brush reasonable. I found them to be really good for the price but nowhere near as good as my beloved WN7 brushes. Still, their size 0 brush had a shape that I really liked for painting eyes so I bought a few more of those and continued using them.

Later, I discovered that they had another, better line of brushes. The Series 22. A month or so ago I bought several of these to try them out and since then I haven't really touched my remaining WN7s. The interesting thing to note here is that I don't really find the brushes significantly better. I think I like the points a little more (they are slightly more blunt at the tips where as the WN7s are incredibly sharp) and they don't have quite the same snap that the WN7s do. Otherwise, I find them to be similar in all other ways. The reason I keep using them is that because their cost is about half that of the WN7s I don't feel like I have to treat them like precious little things that I have to keep in perfect condition for as long as possible.

I should also point out to those of you in the US that shipping is still expensive so it does cut down a but on the savings, but at these prices you should just go ahead and stock up on all of the sizes you think you need. They ship quickly and you'll have your brushes in no time. For me that also eliminates that feeling of dread that a brush is starting to go and I need to start the ordering process as soon as possible or it could be a month before I see another.

So let me just say that I unreservedly recommend the Rosemary and Company Series 22 Brushes as a cost-effective replacement for the Winsor Newton Series 7 brushes. Even if you think that you don't have the need to switch I recommend just trying them out to see for yourself. I'm still using both at this point, but I don't know if I'll ever bother replacing the WN7s that I have right now.

Regarding Miniature Holders

I recently did a video where I looked at the efficacy of miniature holders similar to the one in the recent kickstarter (you can see the video below).

After completing the video, I started working on my own version of the design in Fusion 3D. The idea being that I would come up with a cool design that utilized a collet-like system to hold miniatures in place that would be an improvement on the cord system shown in the Kickstarter.

Today, I spotted a new Kickstarter for a 3D printable miniature holder that includes a collect system for holding the miniatures in place.

Well, now my own design is on hold until I receive the files from the new Kickstarter - which I have backed.

3D Printing - 2 Months In

Apparently it has been two months since my last blog post. I blame my inherent laziness and the fact that it's so much easier to post funny pictures to Tumblr. Two months ago my post was about my first impressions of 3D printing. So today I thought I'd do a follow-up where I talk about how I feel about it now so that you can compare and contrast.

When I first got the printer I was printing pretty much non-stop. I had so many things that I wanted to print and just couldn't wait to get them printed. That seemingly unending enthusiasm for getting stuff printed NOW has tapered off. That's to be expected. On the other hand, the tool has become something of a staple for me now and even if it doesn't end up getting used in everything that I do modeling-wise, I do always take at least a moment to consider how I might use it. Want an odd example? Consider this:

As I was working on Xenomorph minis from the Alien vs Predator line I came across a couple of miscasts. Specifically, the claws would be missing and there would be a void in the fingers where an air bubble had formed. I spent about half an hours looking around the shop to figure out the best way to fill the voids and rebuild the claws. Eventually I started heating and stretching old plastic sprue so that I could create strands of plastic to cut to size and fill the space. The problem with that is stretch sprue is hard and you don't get an evenly size piece of plastic. At some point in this process I glanced at the 3D printer and a metaphorical lightbulb went on over my head. I fired it up and hit the extrude button and got a 10mm string of perfectly-sized ABS plastic that I was able to use for this purpose. It's really just a fluke that this worked so perfectly, but I was happy that it did.

Gozanti Armed Cargo Carrier

The project that inspired me to purchase the printer in the first place is now complete. I'm really very happy with the results - even if it does tend to bring out an unending stream of "companion cube" comments. This is the Gozanti Armed Cargo Carrier. The cargo pods were designed by me and printed on my printer. They were then sanded and primed and painted to get the final result that you see.

Texas or T-Barriers

I think that the thing I've painted most over the past two months is terrain pieces from files on Thingiverse. There's a lot of really interesting pieces from very creative people. My biggest problem with it is that, once printed, I don't always find the time to finish them. I did so a handful of various modern-day barriers that will work well with anything from  modern to sci-fi games. It's nice to have bits like this to add life to your tables. Of course, I haven't had an opportunity to use them yet.

Oh! How could I forget my first "product"? The paint brush rack that I'm selling here on the site is something that I designed for myself. I currently use two of them. One for my brushes, and one for my small tools (X-Acto knight, sculpting tools, etc). So many people asked me about how they could get one that I put both the printing file and printed rack up for sale. 

Babylon 5 PPG

Then, of course, there's the other hobby that I've wanted to be able to indulge myself in for years but have never really had the opportunities to do so. I'm, of course, talking about my interest in sci-fi guns.

Rey's Blaster - work in progress

I've purchased a few kits over the years, but I've never really dived head-first into the hobby. I think because I could never really justify the expense to myself. Sure, they're cool, but at the end of the day they just end up collecting dust. It's sort of the reason that I moved from static modeling to miniature gaming in the first place. Of course, with the expense part of the equation out of the picture I can make all of the "dust collectors" that I want... and I want a lot. I started with the B5 PPG that you see here. I'm following that up with Rey's Blaster from The Force Awakens (and there will be a couple of videos on that one) and I have others in the works as well. The nice thing about these projects is that they're not overly hard to complete. Print the parts. Apply a little elbow grease in the form of sanding. Do a little repair work with putty as needed. Maybe add some details (like the screws in Rey's Blaster). Paint, weather, you're done! These are little side projects for me. I can do a step when I need a break from painting miniatures and then just set it aside. The final results are really satisfying and I didn't have to break the bank to do them.

As for the printer itself, it's held up fairly well. I had one part on it break, but it was easily repaired with a little glue. It's also a part that I can print myself to make a replacement if it comes to that (and I should probably do that before I need it). There is also a plastic film on the heated bed that has started to separate a bit from the bed itself forming small bubbles. The manufacturer says that the aren't really an issue as they are now but I've already looked into replacing it and it shouldn't be expensive or especially difficult to do.

I've tinkered a little bit with the software to see if I could improve on the factory settings but so far it looks like they dial it in pretty well themselves. Nothing I've done has made a positive impact at all. I've also found that the baked in "easy mode" settings in Cura work just fine for 99% of my projects. I've rarely found a need to go in and adjust the various settings that they give you in the advanced mode. I'm honestly not that interest in 3D printing as a "hobby" in and of itself. I just want to use it as a tool. If it gets the job done as I need it to get done as is then I see no reason to tinker. 

I've seen a few articles recently touting the end of 3D printing as people discover that they just aren't very useful and they are too difficult to use. I think that the people who have been writing those articles have no idea what they are talking about. In all cases it seems like they bought one without any clear idea of what they were getting in to or why they were getting one (aside from it being the hot new thing) and ended up disillusioned. I'm finding that it's opening up all sorts of doors for me and I'm discovering new things that it can do for me all of the time. The end isn't near. We're just at the beginning and I'm very excited to see where it all goes from here.

Gaming Across the Third Dimension!

I finally did it. I went ahead and bought a 3D printer.

This new tool is going to probably be the subject of a lot of new videos. Until then, I thought I might share my thinking in terms of making the decision on what to buy.

Budget

This is really where you're probably going to start your shopping. My budget was in the neighborhood of $1200. My research told me that this was going to put me at the high end of hobbyist-level printers. To get anything significantly better you really need to jump up to about $1800-$2000. If you just want to dabble but don't have a lot of money to spend you can actually find printers that start out at about $300. I don't think that you're going to get much in the way of print fidelity but the fact that you can get in at that price level at all is pretty amazing.

With my budget pretty much fixed I had another big choice to make. There are actually a couple of different types of 3D printers I could buy with this budget. The most common type is the Fused deposition modeling (FDM) printer and I certainly had a lot of options there, but there is also now at least one Stereolithography (SLA) printer available in this price range now. In fact, when I asked one of my friends in the special effects industry to ask around to see what people recommended, this is the one that came up.

Printer Type

The XYZ Printing Nobel 1.0 - looks like a pretty cool 3D printer. Because it's an SLA printer it also means that it's capable of better resolution than most FDM printers. There's a couple of downsides, though. First, SLA printers use a liquid resin that it cured by laser. The liquid resin is smelly and messy. When your print is complete you have to clean it up in alcohol in order to get rid of the uncured resin. On top of that the resin is really expensive so your cost per print is going to be significantly higher than FDM. Still, the resolution was tempting. I think the two main reasons were cost and reliability. On the reliability side there were some reviews that pointed out that they were getting some unexplainable errors with the hardware or the prints. Not everybody had these problems, but since there were so few reviews it was hard to say how often these errors actually came up. It made me nervous enough to give it a pass. Still, it was tempting.

Other Considerations

So it was to be an FDM printer after all. It was really a matter of deciding which one. There were a number of considerations once we got past what I wanted to spend. The main ones were ease of use, print size, print resolution and general reliability.

I wasn't too concerned about ease of use. I mean, I do a pretty good job of figuring out how things work. I'm no Luddite and I've been teaching myself new skills for years. On the other hand, it would be nice to be able to jump in and just start going. I did look at some 3D printer kits. You can save a bit of money if you don't mind putting one together yourself. On the other hand, my time is valuable and I don't like the idea of having to troubleshoot something like this knowing that I might have screwed it up myself. Better to get something with a warranty that was ready to go. So the kits were out.

Print size is actually a pretty big dividing line. Most of the printers in my price range print somewhere in the range of 5-6" cubes. Some might have one axis that will do better but for the most part they're in that same range. To get anything much bigger means jumping up to the more expensive options. So I was going to be looking to see what the largest ones in my range were.

Resolution is generally listed in the minimum height per layer and generally listed in microns. At the high end printers will generally do between 50 and 20 microns (that SLA printer would do 20 as well). At my price range it was generally 50-100 microns. On the low end it's between 100 and 200 microns. Obviously I wanted as low a number here as possible.

General reliability is a gut check. This is when reviews become really important. I spent a LOT of time looking at reviews and trying to see if any complaints came up regularly. This mostly meant a lot of reading and this was one of the reasons I passed on the SLA printer.

It actually didn't take took long to find what seemed to me to be the best overall printer for my money. I decided to go with the Lulzbot Mini. It's a fairly new printer on the market but the company who makes it has been around a while (in 3D printer years anyway). Even so, there are a ton of reviews out there for it and the overall opinion is that this is a really good printer for the money. When people complain about it at all it's usually because it uses a filament size that isn't the more common size of filament (though based on my research, this doesn't seem to be a hindrance in any significant way). Oh, another downside is that unlike many printers this one requires that it be connected to a computer for the duration of its print cycle. A lot of people seemed bummed about that. I'll probably end up using a little Raspberry Pi-sized computer that I have to use as a dedicated print machine for the printer so I don't have to leave up of my other machines tethered to it for hours at a time.

Anyway, the printer has been ordered and I should have it in hand in a few days. I'm excited to see how I can fit this new tool into my modeling and gaming hobbies as well as into my business. I'll be sure to keep you up to date on my progress.


Lighting Experiments - (Video Companion)

My last video covered the fact that I've been experimenting with lighting the Assault Carrier for X-Wing and my angst surrounding the fact that I am really outside of my comfort zone. I've had a lot of really good feedback but I also got a request for some photos of the project - which sounded like a great idea to me. If you want to really follow along, be sure to watch the video. 

The inner workings of the Assault Carrier

The inner workings of the Assault Carrier

When I decided on this project in my head I thought that this large model would have a ton of space to work with to do what I wanted to do. Once I opened it up the amount of available space wasn't exactly what I thought it would be. That's mostly because of the number of supports holding the thing together. Still, it should be more than enough to do the lighting that I want to do. There's certainly enough room for LEDs and fiber optic filaments. It's really only the power that is at issue.

In a perfect world I want this to be powered by rechargeable batteries that could be charged by plugging in something like a cellphone charger that plugs into the receptacle that's mounted on the model so you don't need to open it up. Bonus points awarded if the model could remain plugged in so that it could sit on a shelf while lit indefinitely. That's in a perfect world. I know that I could power it with large, watch-like batteries. That solves the space problem. It means that they won't be rechargeable and I can live with that. What I still need to determine is how long those batteries will last before needing to be replaced. If they last for an hour that seems less than ideal. This is something I can test, though.

My current components.

My current components.

So, I bought most of this stuff more than two years ago when I had determined that I wanted to try a lighting project. Then they sat in my shop doing nothing... At least they didn't cost much. Actually, that was a cool discovery, that you can grab the stuff to do this kind of project on the cheap. Take a look:

Of course, that's just the bare-bones. Enough to play around and prove to yourself that you can make light - like a god! I'm still going to need some switches, a different power supply (I already have a soldering iron) and.. I'm not sure what else.

That's really the big takeaway for me on this project. I mention it in the video but I think it's worth mentioning again. I don't know what I don't know and that's what makes this simple project so difficult for me to move forward with. Every decision has me questioning myself. It's tough. I imagine that anybody getting into miniature painting for the first time feels much the same way. 

Baby steps...

Baby steps...


Works in Progress

I've never been one for taking a lot of "work in progress" photos. It might be because I'm too focused on painting to stop and shoot. It may be that when I think about it and have the time then I'd rather put that effort into shooting a video, or it might be because I'm kind of particular about my still photography. Whatever the reason, I just don't capture too many still images of the stuff that I'm working on.

I've been thinking about this recently because of a video that Caledors from the Beasts of War forums put up where he talked about the value of work in progress shots. He talked about the "Iceberg of Success" which in this case means when you see the finished work you might have a basic understanding of some of what went into to getting it to that finished state but you don't really see all of it. I do get that, and a lot of my videos are meant to address that, but I also see the value of finding other avenues of sharing the process and so it has made me want to make a better effort to share more work in progress photos.

What that means for the future is that you'll probably see a lot more work in progress photos here and elsewhere. For example, I'll probably be using Instagram a little more for this kind of thing:

Living with Warcolours Paints

At this point I have just placed my fourth or fifth order with Warcolours. When that order arrives, not only will I have the entire current range of paints, I will also have purchased backups for paints that I know I will be out of shortly. With that in mind, I thought I'd give some more thoughts on the paints now that I've been living with them for more than six months. Especially given that I continue to get questions about them in my YouTube video comments from people who see me using them even though I did a review of them back in June.

First off, let me say that Warcolours Paints did not replace my other paints. At least, not entirely. All paints seem to have their niche for me. What Warcolours does really well is layering and blending. All of the colors tend toward the transparent side (even those marked as "opaque") which makes them ideal in this task. But this also means that if you want to get a quick base coat of a lighter color they are not going to be the paints that I reach for. On the other hand, if I want to build from dark to light they work great. I've really come to depend on their Red range in this capacity. Want a really dark red? Start with a black base (usually primer black for me) then work from Red 5 to Red 3 as your core colors and maybe add some paint highlights with the lighter reds. Works great! But if you want to have a brighter red with less work you might want to base with something from the Citadel base range as that will get you to that core red faster than Warcolour's Red 3 will. Unless you're using an airbrush, of course. Airbrushing the colors on pretty much negates this issue.

One thing I recently tried out was some of the metallic colors. I was a little concerned because the metallic flake in the bottles was fairly apparent which made me think that it was going to look "glittery" on the models. My favorite metallic paints are those with fine metal flake (Citadel and Vallejo both do well in this regard). Still, I tried them out and after some initial trepidation, I found that once you have a couple of light coats on the surface smoothed out and you get a good result. 

Artoo's silver is Warcolour's Pewter highlighted with their Silver. Threepio is Warcolour's Gold and Pale Gold (shaded with Citadel Agrax Eathshade and Seraphim Sepia)

Artoo's silver is Warcolour's Pewter highlighted with their Silver. Threepio is Warcolour's Gold and Pale Gold (shaded with Citadel Agrax Eathshade and Seraphim Sepia)

Not every experience with the metallic paints was super positive. I tried out the Black Copper paint and found it to be slightly darker than the standard copper when I was obviously expecting something much darker. Now, that could be on me. I did thin it some when I was using it and that might have changed how it performed which is something that I've noticed about all metallic paints - they don't seem to like being thinned much - but still, not what I was expecting in terms of results.

As you might imagine, I'm not finding a lot of circumstances where I need the transparent range. When I've used them, I've loved them. When I did my Halo Covenant ships the Violet and Purple over silver worked wonderfully and transparent paints are the only way I could have imagined getting that effect. But these kinds of things don't come up that often so, as with all of my other transparent paints - Badger, Tamiya, they mostly just sit unused).

These types of "candyapple" colors are done by applying a metallic base coat with a transparent color over the top of them.

These types of "candyapple" colors are done by applying a metallic base coat with a transparent color over the top of them.

As for the florescent paint and the glazes... I keep forgetting to experiment with them. So at this point I have no opinion.

I'll continue to provide more thoughts on the color range as I continue to work with the paints. Suffice it to say that I really am enjoying working with the paints even if they don't replace every other paints I own.


A place to buy stencils!

I've been meaning to do this for quite a while now but with all of the painting work I've had there was never a good time to get things going. With the light schedule I've had in January I felt like it was time to finally start offering my stencils for sale.

What does that mean? That means that I have a brand-new Etsy store where  you can buy stencils and masks that I've created for various projects as well as ones that I can see needing in the future. At the moment that means Star Wars X-Wing markings, but I'll be adding more things as time permits.

If you have something that you'd like to see in Stencil/Mask format then please feel free to let me know. 

Looking for January/February projects!

As usually happens, the number of incoming projects drops off in December. This is not unexpected. It does leave you with an opportunity, though.

Most of the time when you commission me to paint for you the wait time is about two months. Right now the wait time can be measured in weeks! This is because I currently only have one solid project for January and a few brewing in the background but not yet finalized. 

What I'm saying is that right now is the PERFECT time to hit me up for work if you're excited by the idea of a quick turn-around.

My photography setup (Part 1)

In my latest video I show off my equipment and setup for shooting miniature figures. I thought that I'd add a bit to what I talk about in the video.

My Camera

When I first started my YouTube channel I was using what I had available to me to shoot video. At that time I had an old flip phone and a web cam. You can still see those early videos. They're pretty bad, quality-wise, but it did get me started on my way and I was still able to convey information with those tools. I did have a nice still camera, though. I bought my first Nikon DSLR in 2005 or 2006 (a Nikon D50) and later upgraded it to an even nicer one (a Nikon D300). I have been working on my miniature photography skills for a lot longer than I'd been doing YouTube videos so the still camera had always been a priority.

At some point I realized that people were starting to shoot real video with their DSLRs and that perhaps I could kill two birds with one stone. My D300 didn't shoot video. It was a wonderful still camera and I really didn't want to give it up, but since I couldn't justify owning two cameras I sold off the old camera and bought a Nikon D3200. Sadly, I was never completely satisfied with this somewhat lateral move. Yes, I could now shoot video with the new camera. Yes, I could shoot still photos on the new camera, but the whole thing just felt clunky.  I was satisfied with the final product that I got with both my still photos and my video but in both cases it felt like I was constantly fighting with the camera's controls.

Since my still work at that point had become almost entirely miniature photos, getting used to the new user interface didn't take too long for that purpose as once you get things set up you rarely have to change anything. Perhaps most of my complaints come from it just being different from the last camera (plus it was missing some of the mechanical functions that got buried in the UI). It was really the video that constantly seemed to vex me. Problems like not being able to adjust the aperture or shutter speed on the fly while the video was shooting. It's little things like that that just add to the overall time it takes to get the work done that really bother me. On top of that I don't think that I ever fully got used to the menu system. I would end up spending a lot of time looking for that one function that I know that I had seen before... it was annoying. It was really sad because of how much I had loved my previous camera.

About a year and a half ago I spotted a video on one of the photography blogs I follow where a pro photographer was going on and on about the virtues of the Sony A6000. I'm sure it was a placed feature created by Sony to promote the camera but it intrigued me. The A6000 is one of the now numerous mirrorless digital cameras on the market. In case you don't know, the mirror in a camera is what gives you the ability to see through the lens of your camera (via the viewfinder) before you shoot a photo. It adds a lot of bulk to the camera. Mirrorless camera's are much like your cellphone (or most point and shoot camera) in that they do away with the mirror to save space. The downside is that your viewfinder is only as good as the video display of the camera. The upside (aside from space savings) is that you should be able to see exactly what your picture is going to look like before you shoot - which is something you don't get through a traditional viewfinder.

On top of the mirrorless benefits, the camera had a bunch of features that you generally only see in cellphones. the ability to upload to social media sites directly, apps, and even the ability to view the shot and shoot from your cellphone. The other thing that they touted was the simple UI. The menu system did seem like a big step up from what I was currently using. 

A few months later I sold my Nikon and bought the Sony A6000.

It's been a year now and I'm not even thinking about upgrading. Well, that's not entirely true. I'm still considering a dedicated video camera. Let's face it, a thing built to do a specific task will generally be better than I thing that does that task in addition to the thing it was primarily built to do. I am satisfied with the Sony. It fixed all of the problems that I had with the Nikon, save one. Both had a 20 minute cap on shooting video before you had to push the record button again. I'm not sure why. In any case, you have to keep that in mind while you're shooting or you could (as I have) waste several minutes before you realize that the camera stopped recording. Still, the UI is nice. I can generally find what I'm looking for quickly. I can change settings while the video is recording, it's super-light and not at all a pain to take places and the photos and video that I get from it are fantastic.

It's funny, though. when I used to take out my old DSLRs in public you would sometimes get various looks from people because they're big and seem to make a statement that you're serious about what you're doing. With the Sony not only is that absent, but people who think that they know about photography will generally write me off when they see my camera. At first glance it's a crappy point and shoot. They don't know that it's every bit as good as that bulky thing that they're carrying.

My Lights

There's not too much to say here. The lights I'm currently using are these tabletop studio lights that I bought from Amazon. I was previously using some cheap floor-stand studio lights that also worked fine but I thought that the tabletop lights would save on space. I'm currently having to rethink how I set things up whenever I shoot because I'm still adjusting to the change. I feel like there must be a better, more flexible lighting system out there somewhere but I haven't yet found it.